Happy
May Day!!! Wow! I can't believe it's May already!!! This year is going so quickly and I just can't believe it's almost half over! That being said, I've had a lot of "Rosie Time" lately. Hubby technically works 2 jobs (a full-time, day job and runs a DJ-ing company), so I'm home in the evenings a lot by myself, as well as sometimes a lot of time on the weekends. I don't mind it actually. I've never really been one to be on-the-go constantly, so being home is actually where I love to be. It is especially welcome when I've had a long week at work. It's so wonderful to just come home on a Friday night, put on some comfy clothes, grab a cup of tea, and bury myself in my craft room for the night! With that being said, I've been VERY busy over the past few weeks!
Here are the projects I can safely share so far. I've got a couple more that are in the works or almost done that I really can't share until after next week, but I promise... They're awesome!! So, without further ado...
Hawaiian Pin-Up Shirt
Hubby needed a Hawaiian-themed shirt for a "Spring Fever Luau" he was DJ-ing and he couldn't manage to find one he liked at the stores. Then.... I got the question. "Can you
make me a shirt?" Of course I couldn't say no. The only rule was that it had to be "cool." After hours of searching online, I found this fabric over at Fabric.com and he loved it! I also bought the same fabric, just different background for his DJ partner for a shirt, but he ended up being out of town for the event, so I didn't rush to get it done.
Hawaiian Pin-Up Button Down Shirt
- Started: April 13, 2014 Finished: April 16, 2015
- Pattern: McCall's M2149
- Fabric: Pin Ups Mirage - Garnet from Fabric.com
- Notions: 5 -19mm clear buttons
- Thread: Coats & Clark - Tan All-Purpose Thread
Butterfly Cuddle Quilt
One of my girlfriends since early childhood is expecting her first (a little girl!) in July. With the shower coming up, I whipped up what is quickly becoming my "signature" baby gift for her.... A Cuddle Quilt. She's definitely not a real flashy gal, so subdued colors were my choice, and the butterflies are just so dang cute! Sorry for the big crease in the pic... it's been folded on my work table for a few days before I was able to snap the pic.
Butterfly Cuddle Quilt
- Started: April 13, 2014 Finished: April 16, 2015
- Pattern: Play Time Quilt by Karie Patch Designs
- Fabric: Snuggle Flannel Solids & Prints from JoAnn's
- Thread: Coats & Clark - Purple All-Purpose Thread
Butterfly Embroidered Burp Cloth
I bought a bunch of the Gerber cloth diapers a few weeks ago, wanting to embroider some as gifts. I pre-washed them all, but then they just sat. Lol. Finally dug one out of the basket, ironed it, and it was ready to go! Added some of the leftover flannel from the Cuddle Quilt to the bottom and used "Pearl" do embroider some cute butterflies on it. The 3-ply cloth diapers are
really thin! Guess I didn't pay too much attention to the package when I bought them. For a burp cloth, I'm sure they'll be fine, I just know the next time I'll go for the 6-ply ones.
Butterfly Burp Cloth
- Started: April 30, 2014 Finished: April 30, 2015
- Pattern: My Own :-)
- Fabric: Snuggle Flannel Butterfly Print from JoAnn's
- Other Materials: 1 - Cloth Diaper, No-Show Poly Mesh Stabilizer
- Embroidery Design: Butterfly Pair (A5140) from Embroidery Library
Sewing Bionic Gear Bag
I made one of these
Bionic Gear Bags back a
few months ago for my BFF and couldn't wait to make more! Before I had even made the first one, I had bought fabric at JoAnn's to make my mom one to hold all of her sewing gear while she's on the road. Found the adorable dress form and tape measure fabrics in the novelty cotton section and snatched it up. You can't see it in the photo, but the insides of the pockets match the blue and coral from the front. Unfortunately, I don't really like how this one turned out. Thinking I should have done different fabrics on the inside instead of all the same.
Sewing Bionic Gear Bag
- Started: April 24, 2014 Finished: April 26, 2015
- Pattern: Bionic Gear Bag by Sally Thompson
- Fabric: Novelty cotton from JoAnn's
- Notions: 4 - 9" Nylon Zippers & 1 - 2" Nylon Zipper from Wawak.com
- Thread: Coats & Clark - Grey All-Purpose Thread
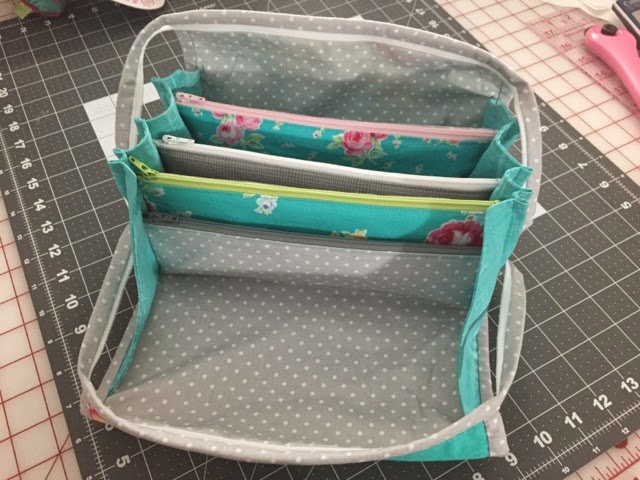
Rosie Bionic Gear Bag
Since I didn't really care for the sewing bag, I went "stash diving" and came up with a FQ bundle I had
bought a while ago from
Fort Worth Fabric Studio. I love, love, LOVE this FQ bundle, and it was soooooo hard to cut into it! But it turned out to be totally worth it as I LOVE the way this bag came out! The colors just pop and are so bright and cheery. Now I can't decide which one to give her... Lol. May just take both of them over for Mother's Day and let her choose.
Rosie Bionic Gear Bag
Nursing Bionic Bag
I saw this fabric over at the Fat Quarter Shop some time ago in their "Coming Soon" section. I requested to be notified when it came in stock, and about 2 weeks ago... I did. Ordered it right away, with really no clue what I was going to do with it. Well, being on this Bionic Bag kick, it became an easy choice. My sister is an ICU Asst Nurse Manager for a Cleveland Clinic hospital and also a mom to an 18-month old and has one one the way due in August. She's always got her "nurse" stuff with her, and this bag is perfect to hold all her band aids, gauze, tape, suture removal kits, etc. Lol.
Nursing Bionic Gear Bag
Happy Friday Everyone!