Showing posts with label Finished Projects. Show all posts

Saturday, January 9, 2016

4 Months?!?!?!

Wow!!  I didn't realize it had been so long since my last post!!!!  I really got swept up in getting ready for a craft show at the end of November and getting my Etsy store up and running.  Once that was all done, the Etsy store took off and I was swamped with orders throughout the month of December.  Really left not much time to sleep, let alone do much else.  Lol.  I've made a decision that I need to re-allocate time and bring back the stuff that I want to do as well as have time for the things I need to do.  I'm not making promises, but my goal is to start really blogging a lot more.  I forgot how much I enjoyed it and really miss posting!  I know I don't have many readers, but hopefully there will be more in 2016 :)

Now, with the holidays done and life returning to "normal," I've decided to take the month of January to get caught up on some personal projects, finish up all the Christmas gifts I didn't get a chance to do, and allow myself to "reset" a bit.

It's been a busy and productive first week of January!  I started the year off with working on some belated Christmas gifts.... particularly the one for my mom.  I felt terrible about not being able to give her more than a mere 2-piece set of embroidered towels due to lack of time.  I actually had purchased a kit for placemats from Keepsake Quilting months ago with the intent of giving them to my mom as her handmade gift for Christmas.  Alas, ran out of time.  Once I cleaned up the disaster my craft room had become, I got to work.  Love how they turned out and they only took me an evening to do :)

May I present... .my first completed project for 2016!!

Unfortunately, the kit is no longer available from Keepsake Quiliting, but I did manage to find it from a shop called Auntie Chris Quilt Fabrics.

Once the placemats were done, I couldn't wait to get started on the next project.  I've got a bunch of friends whom we don't traditionally exchange gifts with for Christmas, but this year they brought us gifts so I really wanted to return the generosity.  I racked my brain for ideas and remember seeing a great tutorial by Melanie Ham on YouTube a while back for some panel pillow covers with a zipper closure that I thought would be good gifts and be relatively easy to do.  I had a bunch of pillow forms in my stash that I originally intended on using for hexi pillow covers, however things got in the way and as of today, still haven't had time to do.  I did a little stash diving and found some fabrics that were going to work perfectly and then got to work.

First up was a pillow for my gal-pal who is a total bacon fanatic.  She'd put bacon on her bacon if that was possible.  Lol.  I had picked up this fabric from Fabric.com a while back as one of those "I just need $4 to get to free shipping" kind of things, figuring I'd find something to use it on.  Once I found the design on Etsy, I knew it was a match made in heaven.  Lol.  Here are the details...

Bacon Zippered Pillow Case


Started: January 4, 2016
Completed: January 5, 2016
Fabric: Timeless Treasures Bacon Black from Fabric.com
Batting: Warm & White scraps from stash
Embroidery Design: "Either You Love Bacon or You're Wrong" by ChicEmbroidery on Etsy
Pillow Form: 16" x 16" Pillow Form -  Fairfield Poly-Fil Soft Touch Square Pillow
Zipper: 18" Black Zipper from Wawak

I'm not going to see my gal-pal until the 24th of this month, so for right now it's wrapped and waiting.  Can't wait to see the look on her face!  If only there was a way to make it bacon scented... it would really be awesome!

I had so much fun doing that pillow that I couldn't wait to make another.  Next up was a pillow for Hubby.  It's been a while since I had made him anything other than a keychain, so I figured it was about due.  Ha ha ha.  Hubby is a HUGE Doctor Who fan, so while perusing Etsy for some cool embroidery designs, I stumbled on this one from a shop called TedandFriends.  They've got some really cool "geeky" designs!  Once I found the design, it was off to figure out the fabric.  Again, I turned to Fabric.com and found some Fox and Houndstooth Bowties fabric by Robert Kauffman.  Unfortunately, they were out of stock and the other colorway (blue and teal) just wouldn't work. After scouring the internet, I found some yardage from another Etsy store called Texas Susannie's.  Ordered right away and got it days later!  Great customer service!! Once the first pillow was done, I wasted no time in getting this one started!

I'm really not happy with all the puckering in these two pillows in the embroidery, however I've been doing some research and think I might have found a solution.  Will be trying some new things on the next one and see if that helps, but in the meantime... Hubby was ecstatic with his gift!  Here are the details...

Bowties Are Cool Zippered Pillow Case

Started: January 6, 2016
Completed: January 8, 2016
Fabric: Fox and The Houndstooth Bowties Black by Robert Kauffman from Fabric.com
Batting: Warm & White scraps from stash
Embroidery Design: "Bowties Are Cool" by TedandFriends on Etsy
Pillow Form: 16" x 16" Pillow Form -  Fairfield Poly-Fil Soft Touch Square Pillow
Zipper: 18" Black Zipper from Wawak

Feels so great to actually be getting back to my "roots" and doing a little sewing and quilting!  I didn't realize just how much I missed it until I started doing these.  I just bought a bunch of fabrics and have embroidery designs picked out for more, most likely going to be listed in my Etsy shop for sale.   Also have the stuff together to make a couple more as belated gifts, so most likely I'll be working to get those done here over the next few days.

I've got a couple more personal projects that I would like to work on over the upcoming weeks, and can't wait to get started!  It really kinda feels weird that I'm not under pressure, stressed, and sleep-deprived with trying to get stuff done for shop and show deadlines.  This little "reset" I'm doing is really helping and making me happy.  Don't get me wrong, the shop is still up and I have a couple of shows this year, but I figured that I can start prepping inventory come next month or so and spend some time just being creative instead of being an assembly line :)

Hope everyone has had a wonderful Saturday, and don't worry..... I'll be back and more frequently (I hope) with all kinds of fun updates!!

Linking up with Show Off Saturday at SewCanShe


Friday, May 15, 2015

Finish Friday: Totally Wicked

Well... I can FINALLY share my "top secret" project I've been working on over the past few weeks (ahem....months).


This one is for my mother-in-law who is a HUGE Wizard of Oz fan.  She even refers to herself as the "Wicked Witch" and threatens to "send her flying monkeys at us."  I bought the panel months ago and then found the matching fabrics to go with it.  I had no clue what pattern to do, but then found the "Totally Wicked" quilt by Quilting Treasures online and it was perfect!


The top was fairly easy to assemble, but I did realize after I had started that, according to the pattern, the finished quilt size was going to be a bit on the small side (44" x 52").  I wanted this one to be something big enough for her to cuddle under, so I added a 1" green border, and then a 5" black-print border.  The final size (before washing) was 56" x 64" which I thought would be a good size.


I'm getting much better (and faster) with basting, so I had no trouble putting this one together.  The backing is plain black and I used unbleached cotton batting due to the white fabrics (didn't want them to look "dingy" by using natural batting).

Then came the fun part... Quilting!

I had NO CLUE how to quilt this baby.  I didn't want to do too much over the panel in order to prevent from distorting it, so I went with a simple cross-hatch and used a Hera marker to draw the lines (no, I don't quilt that straight without help.  Lol).  After the panel was quilted, I just did stitch-in-the-ditch around the diamonds in the border, and then along the borders themselves.

Oh, I forgot to mention... I really didn't want to use any color thread for the quilting that would make the panel look awful, so after doing some research online as well as getting some tips from the Missouri Star forums, I went with some YLI Wonder Invisible thread in the top and just black Superior Omni thread in the bobbin.  I honestly was expecting some troubles with tension and breakage, but "Rosie" (my Viking Eden Rose 250c) did a wonderful job with absolutely no problems!

I started the quilting a few weeks ago, but then got sidetracked with a bunch of little projects (here and here), so it got put on the back burner.  With the intended due date of Mother's Day, I finally had to kick it into high gear and get it done.  I cranked out the rest of the quilting, and then the binding followed soon after.

Since I added the extra border, I didn't have enough fabric to do the original binding on it.  I went in search of a suitable replacement and found some Black & White Striped fabric by Timeless Treasures on Etsy and it was a perfect fit!  Totally reminds me of the socks the witch was wearing when the house fell on her!!

Finally, it was DONE!  Just needed a label and it was ready to go.  I made up a label on my embroidery machine and even did some cool applique on it!


The applique ruby slippers came from AppliqueGuru on Etsy, and I found some cool red sparkly fabric at JoAnns on one of my recent trips.  The fonts used were ones that I had on my computer and was able to digitize them using the Viking 6D QuickFont program.  Took 3 tries to get it to look good, but it was totally worth all the effort.  Added some of the extra binding to the edges and I am so pleased with it!

"Totally Wicked" Details:

Now it's time to get started on a new project!!  Hopefully the next one won't take so long to complete  :-)

Hope everyone has a Fabulous Friday!


Friday, May 1, 2015

Finish Friday: Lotsa Projects Pt. 2

Happy May Day!!!  Wow!  I can't believe it's May already!!!  This year is going so quickly and I just can't believe it's almost half over!  That being said, I've had a lot of "Rosie Time" lately.  Hubby technically works 2 jobs (a full-time, day job and runs a DJ-ing company), so I'm home in the evenings a lot by myself, as well as sometimes a lot of time on the weekends.  I don't mind it actually.  I've never really been one to be on-the-go constantly, so being home is actually where I love to be.  It is especially welcome when I've had a long week at work.  It's so wonderful to just come home on a Friday night, put on some comfy clothes, grab a cup of tea, and bury myself in my craft room for the night!  With that being said, I've been VERY busy over the past few weeks!

Here are the projects I can safely share so far.  I've got a couple more that are in the works or almost done that I really can't share until after next week, but I promise... They're awesome!!  So, without further ado...


Hawaiian Pin-Up Shirt


Hubby needed a Hawaiian-themed shirt for a "Spring Fever Luau" he was DJ-ing and he couldn't manage to find one he liked at the stores.  Then.... I got the question.  "Can you make me a shirt?"  Of course I couldn't say no.  The only rule was that it had to be "cool."  After hours of searching online, I found this fabric over at Fabric.com and he loved it!  I also bought the same fabric, just different background for his DJ partner for a shirt, but he ended up being out of town for the event, so I didn't rush to get it done.

Hawaiian Pin-Up Button Down Shirt

  • Started: April 13, 2014     Finished: April 16, 2015
  • Pattern:  McCall's M2149
  • Fabric: Pin Ups Mirage - Garnet from Fabric.com
  • Notions: 5 -19mm clear buttons
  • Thread: Coats & Clark - Tan All-Purpose Thread

Butterfly Cuddle Quilt


One of my girlfriends since early childhood is expecting her first (a little girl!) in July.  With the shower coming up, I whipped up what is quickly becoming my "signature" baby gift for her.... A Cuddle Quilt.  She's definitely not a real flashy gal, so subdued colors were my choice, and the butterflies are just so dang cute!  Sorry for the big crease in the pic... it's been folded on my work table for a few days before I was able to snap the pic.

Butterfly Cuddle Quilt

  • Started: April 13, 2014     Finished: April 16, 2015
  • Pattern:  Play Time Quilt by Karie Patch Designs
  • Fabric: Snuggle Flannel Solids & Prints from JoAnn's
  • Thread: Coats & Clark - Purple All-Purpose Thread


Butterfly Embroidered Burp Cloth


I bought a bunch of the Gerber cloth diapers a few weeks ago, wanting to embroider some as gifts.  I pre-washed them all, but then they just sat.  Lol.  Finally dug one out of the basket, ironed it, and it was ready to go!  Added some of the leftover flannel from the Cuddle Quilt to the bottom and used "Pearl" do embroider some cute butterflies on it.  The 3-ply cloth diapers are really thin!  Guess I didn't pay too much attention to the package when I bought them.  For a burp cloth, I'm sure they'll be fine, I just know the next time I'll go for the 6-ply ones.

Butterfly Burp Cloth

  • Started: April 30, 2014     Finished: April 30, 2015
  • Pattern:  My Own :-)
  • Fabric: Snuggle Flannel Butterfly Print from JoAnn's
  • Other Materials: 1 - Cloth Diaper, No-Show Poly Mesh Stabilizer
  • Embroidery Design: Butterfly Pair (A5140) from Embroidery Library


Sewing Bionic Gear Bag


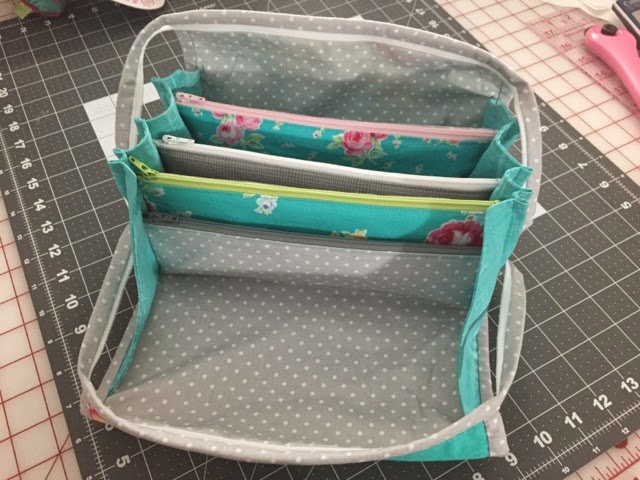
I made one of these Bionic Gear Bags back a few months ago for my BFF and couldn't wait to make more!  Before I had even made the first one, I had bought fabric at JoAnn's to make my mom one to hold all of her sewing gear while she's on the road.  Found the adorable dress form and tape measure fabrics in the novelty cotton section and snatched it up.  You can't see it in the photo, but the insides of the pockets match the blue and coral from the front.  Unfortunately, I don't really like how this one turned out.  Thinking I should have done different fabrics on the inside instead of all the same.

Sewing Bionic Gear Bag

  • Started: April 24, 2014     Finished: April 26, 2015
  • Pattern:  Bionic Gear Bag by Sally Thompson
  • Fabric: Novelty cotton from JoAnn's
  • Notions: 4 - 9" Nylon Zippers & 1 - 2" Nylon Zipper from Wawak.com
  • Thread: Coats & Clark - Grey All-Purpose Thread

Rosie Bionic Gear Bag


Since I didn't really care for the sewing bag, I went "stash diving" and came up with a FQ bundle I had bought a while ago from Fort Worth Fabric Studio.  I love, love, LOVE this FQ bundle, and it was soooooo hard to cut into it!  But it turned out to be totally worth it as I LOVE the way this bag came out!  The colors just pop and are so bright and cheery.  Now I can't decide which one to give her... Lol.  May just take both of them over for Mother's Day and let her choose. 

Rosie Bionic Gear Bag


Nursing Bionic Bag


I saw this fabric over at the Fat Quarter Shop some time ago in their "Coming Soon" section.  I requested to be notified when it came in stock, and about 2 weeks ago... I did.  Ordered it right away, with really no clue what I was going to do with it.  Well, being on this Bionic Bag kick, it became an easy choice.  My sister is an ICU Asst Nurse Manager for a Cleveland Clinic hospital and also a mom to an 18-month old and has one one the way due in August.  She's always got her "nurse" stuff with her, and this bag is perfect to hold all her band aids, gauze, tape, suture removal kits, etc.  Lol.

Nursing Bionic Gear Bag


Happy Friday Everyone!


Friday, April 3, 2015

Finish Friday: Busy As A Bee


With the arrival of my third "nephew" back in January, I've been in complete "baby mode."  The baby's nursery theme is "Bees and Honey," and I was having the HARDEST time finding fabric!  Seriously... checked out every online store I could think of, as well as JoAnn's and Hobby Lobby, and came back empty handed.  Well, that was until a couple of weeks ago.  Just happened to be browsing the aisles at JoAnn's and stumbled on some adorable bee flannel. Just knew it needed to be turned into something fun!  I already made a self-binding receiving blanket for him, but hadn't done one of my Cuddle Quilts yet.  Forty minutes later (having the hardest time matching colors for some reason), I was ready to go.

LOVE how easy these quilts are.  No time in getting the pieces cut, and even the main assembly is really quick.  Only issue I seem to have on each one of these is my basting stitches on the twists showing thru.  Thinking on this one I should have used white thread instead of black for the piecing... but ah well!  It was done and ready to give last weekend.  Mommy & baby love it!


Happy Friday Everyone!


Fort Worth Fabric Studio


Linking back to Fabric Friday at Fort Worth Fabric Studio, Finish It Friday at Crazy Mom Quilts , TGIFF at Quokka Quilts, Can I Get a Whoop Whoop? over at Confessions of a Fabric Addict, and Link-A-Finish Friday at Richard & Tanya Quilts

Friday, March 20, 2015

Friday Finish - For the Hubby

I know every person out there who is married thinks the same thing.... I am the luckiest person in the world.  I'm here to tell you, I fit into that group as well!  Hubby and I have been together for almost 15 years (married for 10 years this October) and he is truly my best friend, my other half, my soul mate.  He loves me for who I am and says he wouldn't change a thing.  It is because of that love that I am the person I am today.  He supports me in whatever I want to do, and even "fuels the fire" a majority of the time, enabling me more than any one else I know.

Because of that, I knew I just had to make him something (well, other than another button-down shirt).  I knew he was going to get a quilt.... someday.  But when I found this "Family Guy" fabric over at the Fat Quarter Shop as one of their 24-Hour Flash Sale items, it was a perfect fit!


  "Family Guy" Quilt Details:
This quilt should not have taken as long as it did, but my indecisiveness on the quilting added to the impromptu other projects that needed done caused it to get sidelined for a bit.  Overall, I'm pretty happy with the way it turned out, and I think Hubby is too!  

Now it's on to the next one...... :-)

Happy Friday Everyone!


Fort Worth Fabric Studio


Linking back to Fabric Friday at Fort Worth Fabric Studio, Finish It Friday at Crazy Mom Quilts , TGIFF at ayliN-Nilya, Can I Get a Whoop Whoop? over at Confessions of a Fabric Addict, and Link-A-Finish Friday at Richard & Tanya Quilts

Friday, March 6, 2015

Finish Friday - It's About Time


I'm Being "out of commission" for most of February has put me behind where I want to be by now with my projects for this year.  When I started off this week, I had three UFOs on my desk.  Hubby's Family Guy quilt, the Valentine's Day vests for my DJ's, and the Bionic Bag for my BFF. 

Well.... I got two of the three done this week.  Not too shabby if you ask me. 

Bionic Bag for the BFF


As I stated in my post from earlier this week, thank GOD for the video tutorial I found on YouTube for this little bag!  I don't think I would have been able to complete it without it!  I bookmarked the link, so for the next one(s) I've got planned, it'll be an easy reference for me.  I'm sure that after I get a couple done, it'll be easy-peasy... but until then, I'm grateful for the help!

Bionic Bag Details:

  • Started: February 26, 2015     Finished: March 2, 2015
  • Pattern:  Bionic Gear Bag by Sally Thompson
  • Fabric: Novelty & Keepsake Calico fabric from JoAnn's, Pellon SF101 Interfacing
  • Notions: 4 - 9" zippers and 1 - 22" zipper from Wawak.com
  • Thread: Coats & Clark - Pink All-Purpose Thread

Valentine's Day Vests for the DJ's


These were intended to be worn on Valentine's Day by my DJ guys, but alas... life got in the way and I didn't get them done in time.  Hubby ended up not DJing that night anyways because we were headed to PA for my grandmother's funeral, but that's besides the point.  I wanted to get them 100% done so that they will be ready to wear for next year, plus two less items on my UFO list!
 
Valentine's Day Vests Details:

  • Started: February 5, 2015     Finished: March 5, 2015
  • Pattern:  McCall's Pattern M2447 - Sizes XL & XXL
  • Fabric: Valentine's Day Fabric, County Classic Solids (lining), and Costume Satin (Backing) from JoAnn's
  • Notions: 5 - 5/8" Buttons & Tie Buckle from JoAnn's
  • Thread: Coats & Clark - Black All-Purpose Thread
I've still got Hubby's Family Guy Quilt to finish, but it's going to have to stay in the UFO pile for a little while longer.  My DJ guys are going to be MC'ing a St. Patrick's Day party on the 13th and they want St. Patrick's Day vests to wear.  I've had the stuff for months, but now it's crunch time to get them done in time.  With any luck, they'll both be done by the end of this weekend, and then I'll be able to tackle finishing up on the quilt.  As of today, we've only "technically" got 14 days left until spring, and I'd like Hubby to be able to somewhat enjoy it this year.  Lol.

Hope everyone is having a fabulous Friday, and has a great weekend to come!


Fort Worth Fabric Studio


Linking back to Fabric Friday at Fort Worth Fabric Studio, Finish It Friday at Crazy Mom Quilts , TGIFF at Quokka Quilts, Can I Get a Whoop Whoop? over at Confessions of a Fabric Addict, and Link-A-Finish Friday at Richard & Tanya Quilts

Friday, January 23, 2015

Finish Friday: Side Projects


Wowzers!  Been a minute since I posted... Sorry!!  Guess my "New Years Resolution" to post more frequently isn't going so well. Lol. 

I have been a busy little bee though. Cranked out a couple of small projects, even though Hubby's "Family Guy" quilt is sitting.... Basted and ready to quilt. I think subconsciously I keep putting it off because I still don't have a "plan" for quilting yet. I'm vowing to get to it this weekend though.... I'd like to get this done before spring and Hubby can actually use it before next winter!!  Lol

Finish #1 (& 2) - "Rock Legends"Button-Down Shirts (x2) for Hubby and his DJ-ing partner


There are actually 2 shirts in this pic, but really all you can see is one.  Hubby picked out this fabric from Fabric.com called "Rock Legends Musical Skulls."  Quite appropriate for them seeing as its skulls with headphones :)  This makes shirts numbered #7 & 8 that I've made so far.  Getting so good at these that I don't even need the directions anymore!

Rock Legends Shirt Details:

  • Started: January 9, 2015     Finished: January 20, 2015
  • Pattern:  McCall's M2149
  • Fabric: Rock Legends Musical Skulls
  • Notions: 4 - 3/4" Black Buttons
  • Thread: Coats & Clark - Black All-Purpose Thread


 Finish #3 - Wall Organizer


I stumbled upon a gal's blog called Fort Worth Fabric Studio and checked out all her awesome tutorials.  Saw this adorable wall organizer and knew right away I needed to make one :-)  While at what has become my weekly pilgrimage to JoAnn's last Friday, I picked up the fabrics for this to match my kitchen.  Came together so easy, I thought I was doing something wrong... Lol.  I even used "Pearl" to do some embroidery on it.  Used the Viking 6D Communicator software to use a font off of my PC on my embroidery machine.  So incredibly proud of myself for that one... Ha ha ha.  I know it's not centered, and at first I couldn't figure out why.  But after a post over on one of the Facebook groups I belong to, I found out that there is an official top and bottom of the inner hoop for the machine, and the little arrows need to match.  Whoops!  Didn't know that!  Wasn't too big of a deal considering it's just for me, but now I know for future reference :-)

Wall Organizer Details:


 I've also got a crochet WIP going too....  Like I don't have enough projects on my plate as it is.  Lol. 

I found this kit over at Herrschners for their Baby Bright Scallops Blanket that I though was absolutely adorable!  Considering I've got a yarn stash that looks more like a yarn store... I figured instead of buying the kit, I'd use something I already had.  The pattern was pretty easy to figure out, and once I got done digging thru all my tubs to find something to make it with... I was ready to go.  I've got a girlfriend expecting #4 this weekend, and thought the colors would work well for her.  This is boy #3, and they're totally not the fru-fru baby colors types.  I was hoping to get it done before "Baby J" makes his arrival, but it's taking me a lot longer than I thought it would.  I haven't crocheted anything in YEARS, but it really is like riding a bike, so I picked it back up with no problem.  I just can only manage to get 1-2 color rows done a night before I start going cross-eyed and have to put it down for the evening.  Got the last 6-7 episodes of American Horror Story: Freak Show to watch, so maybe I'll plop down at some point this weekend and get some work done on it. 


Hope everyone has had a wonderful week, and have a great weekend to come!


Linking back to Finish It Friday at Crazy Mom Quilts , TGIFF at From Bolt To Beauty, Can I Get a Whoop Whoop? over at Confessions of a Fabric Addict, and Link-A-Finish Friday at Richard & Tanya Quilts